The Celtic Cross Tarot Spread: A Complete Guide
Disclaimer: This post contains affiliate links. If you make a purchase through them, we may earn a small commission at no extra cost to you.
There’s a reason the Celtic Cross tarot spread has been around for over a century. It’s not the easiest spread to learn. It’s not the quickest to read. But when you genuinely don’t know what’s going on — when a situation feels tangled and you can’t figure out why — nothing else comes close.
Ten cards. Ten positions. And if you read them right, a map of everything that’s actually in play: what you can see, what you can’t, what’s working against you, what you’re telling yourself versus what’s really true.
This guide breaks down every position, explains how they talk to each other, and walks you through a real reading from start to finish. By the end, you’ll know not just what each card slot means, but how to weave all ten into something coherent.
What is a celtic cross tarot reading?
The Celtic Cross is a ten-card layout that examines a single situation from multiple angles at once. Most spreads give you a timeline or a choice. The Celtic Cross gives you a full picture — the surface level and the underneath, the past that’s still pulling on things, the fears that might be shaping the outcome more than the facts are.
It’s the spread you reach for when a question has layers. When “what’s happening?” isn’t enough and you actually need to know why.
That said, it’s not for every reading. If you have a clear, focused question and three cards would answer it — use three cards. The Celtic Cross is worth the investment when the situation genuinely calls for it.
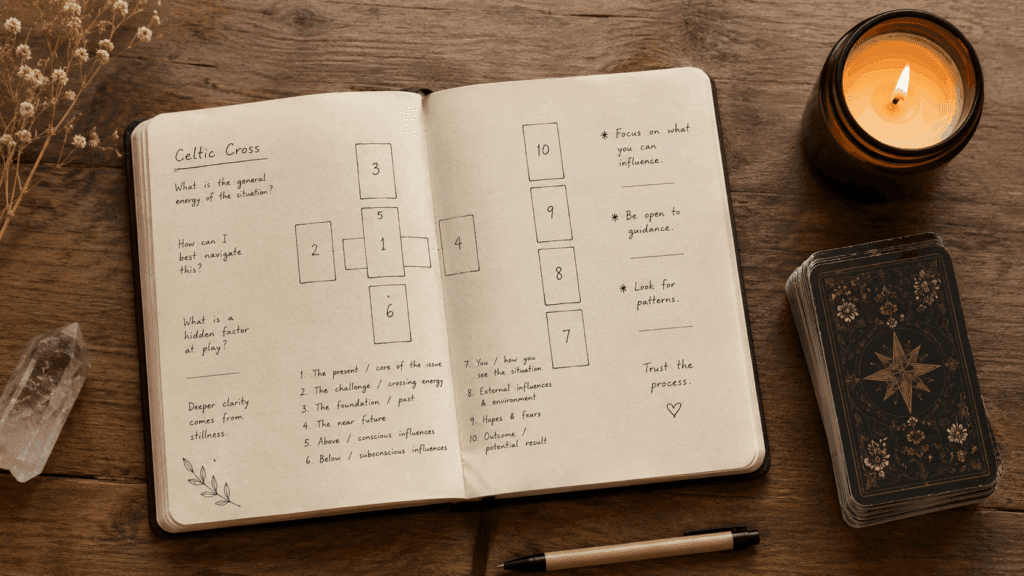
Celtic cross tarot reading interpretation: The 10 positions
Card 1 — The Present / The Heart of the Matter
This is the center card. It represents the current situation, the core energy of whatever you’re asking about, or simply where you are right now. Everything else in the spread orbits around this card.
Sometimes it confirms what you already know. Other times it reframes the whole question. If the card here surprises you — if it doesn’t seem to fit — hold that. By the time you’ve read all ten cards, it usually makes sense.
Card 2 — The Cross / The Challenge
This card is placed horizontally across Card 1, literally crossing it. It represents whatever is complicating the situation right now — an obstacle, a conflicting energy, something working against you, or sometimes something working for you in a way that creates friction anyway.
Important note: this isn’t automatically a negative card. The Cross position holds whatever is creating tension, and tension isn’t always bad. The Two of Cups crossing you might mean a relationship is pulling you in a direction that complicates your focus.
Card 3 — The Foundation / Root Cause
Below the center. This is the deep root of the situation — something from the past that’s still actively shaping what’s happening now. Not ancient history for its own sake, but whatever is structurally underneath the present moment.
Think of it as the ground the situation grew out of. If something keeps repeating in your life, this position often shows you why.
Card 4 — The Recent Past
Just behind you. This card shows what’s been happening in the lead-up to now — the energy or events of the last few weeks or months that are still trailing into the present. It’s already moving out of the frame, but it hasn’t fully cleared yet.
Card 5 — Possible Outcome / What Could Be
Above the center. This position has different names in different traditions — some readers call it the “best possible outcome,” others call it “what is possible.” Either way, it points to a potential, not a guarantee. Think of it as the ceiling of where things could go if the energy moves in a positive direction.
Card 6 — The Near Future
Just ahead. Where things are naturally heading over the next few weeks, based on current energy. Not the final outcome — that comes later — but the next chapter.
The Staff — The Right Column
Cards 7 through 10 form a vertical column on the right side of the spread. Together they show the internal landscape: how you see yourself, what’s shaping the situation from the outside, your hopes and fears, and where everything is most likely to land.
Card 7 — Your Attitude / How You See Yourself
This is how you’re showing up to the situation — your mindset, your self-perception, the energy you’re bringing. It’s not always flattering. Sometimes it reflects a fear you’ve been wearing as a personality, or a strength you’ve been underselling.
Card 8 — External Influences
What’s coming from outside — other people, environment, circumstances you didn’t create and can’t fully control. This card often names the thing everyone around you can see that you might be too close to notice.
Card 9 — Hopes and Fears
This is one of the most interesting positions in the spread, because it holds both at once. What you’re hoping for and what you’re afraid of are often the same thing — or so closely linked that the same card can speak to either. Pay attention to whether your immediate reaction to this card is hope or dread. That reaction is usually more revealing than the card itself.
Card 10 — The Final Outcome
The last card. Where everything is pointing if the current energy holds. Not a fixed prediction — tarot doesn’t work that way — but the most likely destination based on everything else in the spread.
Read this card alongside Card 5 (possible outcome) and Card 6 (near future). The three together tell you not just where things are heading, but whether you’re on the track toward the best possible version of this situation or drifting somewhere else.
How the Cards Talk to Each Other
Reading ten cards in isolation is a mistake. The Celtic Cross is a conversation, and certain pairs are worth paying attention to:
Cards 1 & 2 — The core tension. What you’re dealing with, and what’s complicating it. These two set the tone for everything else.
Cards 3 & 4 — The history. What’s deep underneath (Card 3) and what just happened (Card 4). Together they explain how you arrived at Cards 1 & 2.
Cards 5 & 10 — Potential vs. probability. Card 5 is what could happen; Card 10 is what’s likely to happen. A gap between them is information — it tells you something needs to shift.
Cards 7 & 8 — Internal vs. external. Your mindset (Card 7) against outside forces (Card 8). When these two are at odds, that friction is usually the real issue.
Card 9 on its own — Ask yourself honestly: is your first reaction to this card hope or fear? You’ll learn more from that answer than from any keyword definition.
How to read celtic cross tarot cards: Step-by-step
Before you start: This spread rewards a clear question. Not “what’s going on with my life” — something specific. A relationship, a decision, a situation that’s been sitting unresolved. The more focused your question, the more useful the ten positions become.
- Shuffle with your question in mind — Take your time. This isn’t a spread you rush.
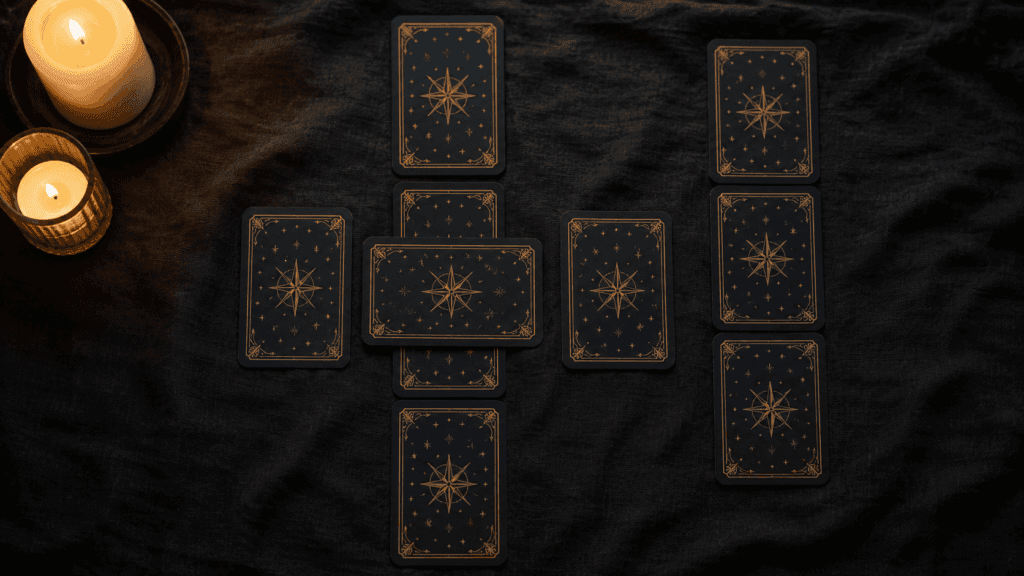
- Lay Cards 1 and 2 first — Card 1 face up in the center, Card 2 sideways across it.
- Lay Cards 3, 4, 5, 6 — Below, left, above, right of the center pair, forming a cross.
- Lay Cards 7, 8, 9, 10 — In a vertical column to the right, bottom to top.
- Read the cross first — Cards 1 through 6 before you touch the staff. Get the full picture of the situation before you look at the internal and external layers.
- Read the staff — Cards 7 through 10, bottom to top.
- Read everything together — Find the pairs, find the arc, find the story.
Write it down. A Celtic Cross reading has enough moving parts that you’ll miss things if you’re trying to hold it all in your head.
How to read tarot cards celtic cross spread: A real example
Looking for spreads designed specifically for love readings? Our Love & Relationship Tarot Spreads guide covers five layouts for every stage — from new connections to deciding whether to stay or go.
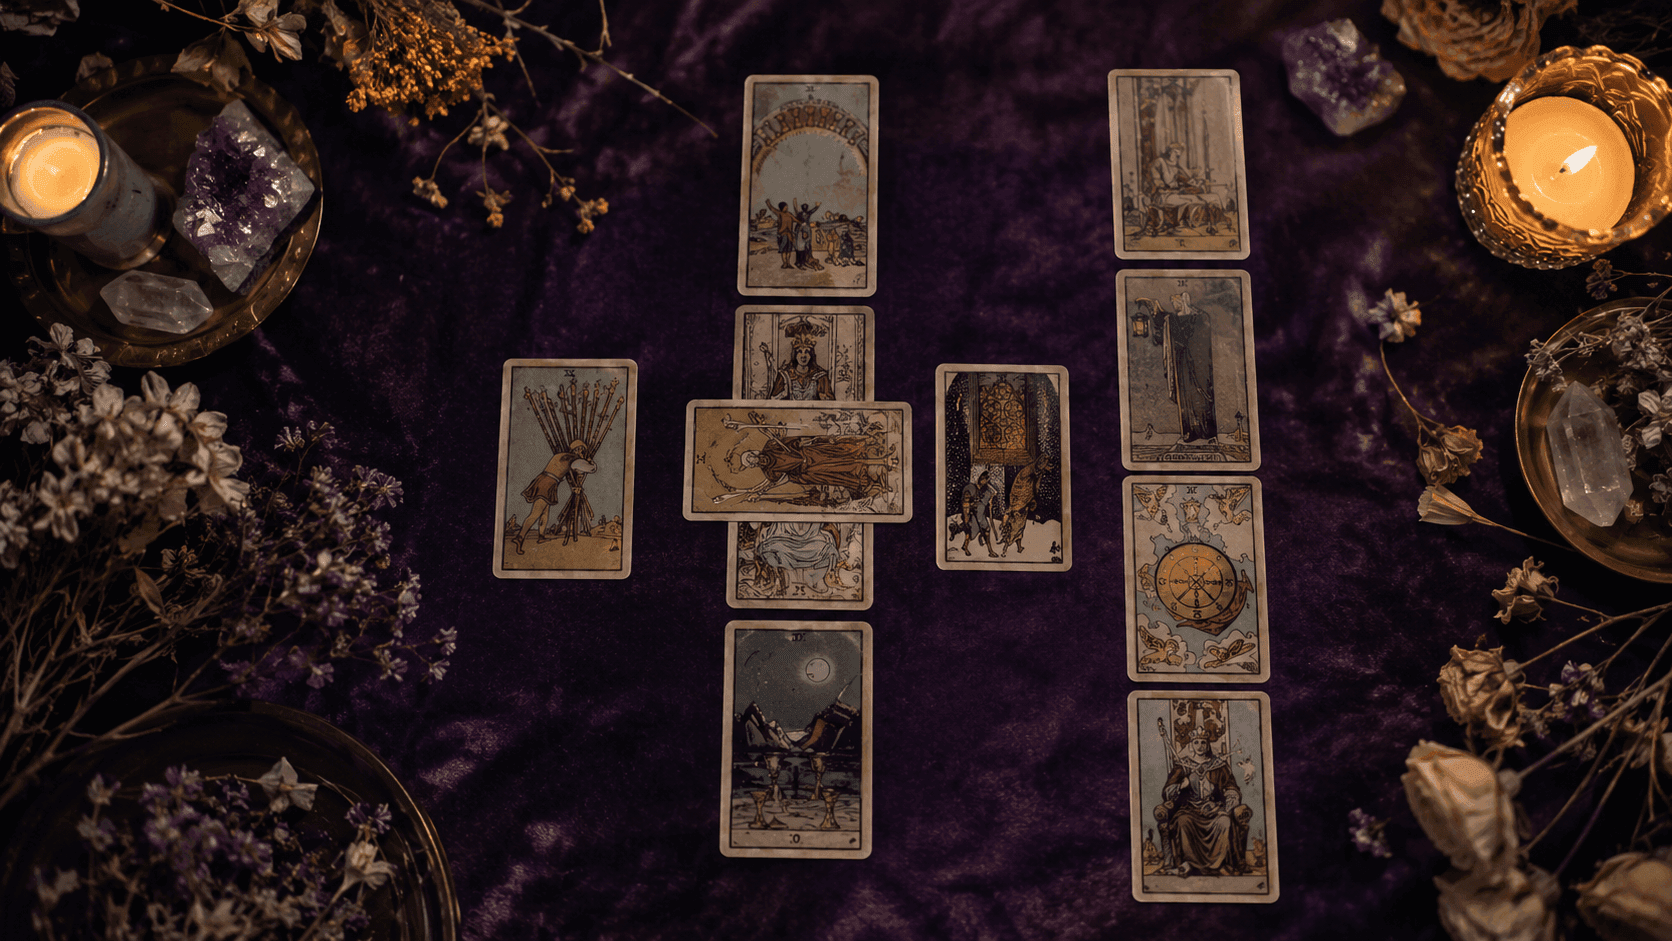
Question: What do I need to understand about why this relationship keeps stalling?
Cards:
- Card 1 (Present): Two of Cups
- Card 2 (Challenge): The Hermit
- Card 3 (Foundation): Five of Pentacles
- Card 4 (Recent Past): Three of Wands
- Card 5 (Possible Outcome): The Lovers
- Card 6 (Near Future): Four of Cups
- Card 7 (Your Attitude): Seven of Swords
- Card 8 (External): Ten of Wands
- Card 9 (Hopes/Fears): The Tower
- Card 10 (Final Outcome): Ace of Cups
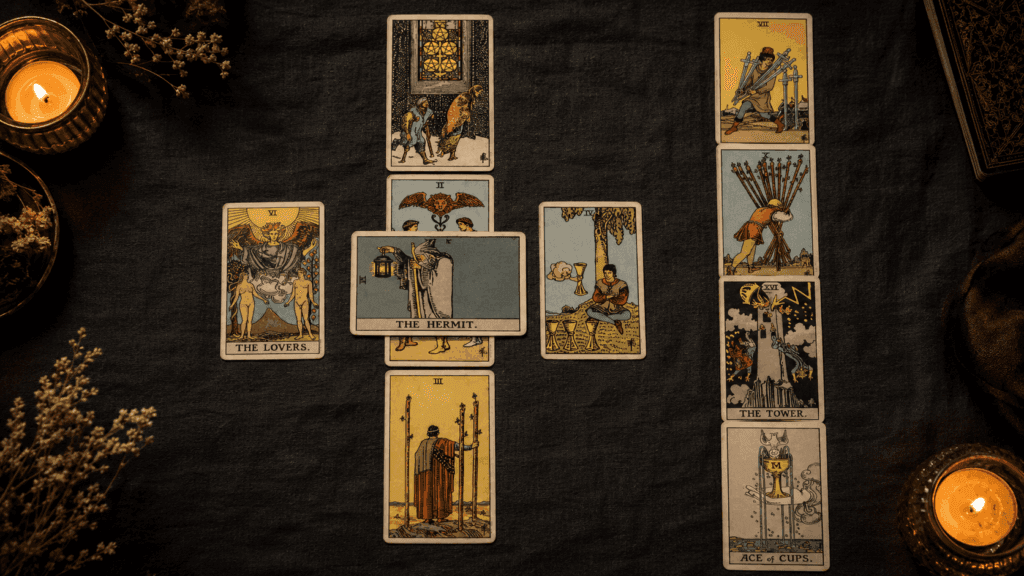
The story:
Before diving into the positions, the first thing that hits you looking at this spread is the tension. There is genuine connection here, but it’s heavily surrounded by defensive, tired, and fearful energy. Let’s break it down.
Starting right in the center, the Two of Cups shows that the connection itself is real. There’s mutual recognition and genuine feeling worth paying attention to. But look at what’s immediately crossing it: The Hermit. This tells you exactly why things keep stalling. One or both people keeps retreating. Not necessarily out of disinterest, but because The Hermit demands space and solitude. Someone isn’t ready to step fully into this connection, and that withdrawal is the primary roadblock.
If we look down at the foundation to understand why, the Five of Pentacles is sitting there. This is crucial. It points to an older, deeper fear—scarcity, abandonment, the feeling of being left out in the cold. That fear didn’t start with this relationship, but it’s the invisible engine driving that Hermit retreat.
Glancing at the recent past, the Three of Wands says there was a moment of real optimism not long ago—plans were forming, things were moving. So what’s the trajectory now? The Four of Cups in the near future serves as a warning. Without intervention, this situation is drifting toward apathy. Someone is getting so focused on what’s missing that they’re ignoring what’s actually in front of them.
Moving to the right side of the spread, the attitude card (Seven of Swords) is worth sitting with for a moment. It suggests self-protection strategies that look a lot like avoidance. Someone is saying one thing but doing another. Couple that with the Ten of Wands externally, and you see someone who is simply carrying too much—overcommitted, exhausted, and lacking the emotional bandwidth for this right now.
Then we hit Card 9. The Tower in the hopes and fears position is one of those cards that stops you mid-reading. The fear of total collapse is obvious here. But remember, this position also holds hopes. Sometimes, seeing The Tower here means someone secretly wants the whole thing to blow up, because the slow, agonizing stall is actually more painful than a clean, sudden ending.
Ultimately, the Ace of Cups as the final outcome is a breath of fresh air. It offers a genuine new emotional beginning. But Aces are just seeds, not the fruit. To get to this outcome—and to reach The Lovers sitting up in the potential slot—someone has to choose openness over those old, protective patterns.
A Few Things Worth Knowing
You don’t have to use all ten positions rigidly. Some readers adapt the Celtic Cross over time — swapping out the Hopes/Fears position for “subconscious influences,” or treating Card 5 as “what to focus on” rather than “possible outcome.” There’s no tarot police. Use the framework that makes the most sense to you.
Reversed cards hit differently in this spread. With ten positions and potentially several reversals, the reading can get unwieldy fast if you’re new to reversals. Either read all upright until you’re comfortable with the spread itself, or choose one consistent approach and stick to it before you shuffle.
The Celtic Cross can feel overwhelming the first few times. That’s normal. Don’t try to interpret all ten cards simultaneously — read in layers. Cross first, staff second, connections third. The coherence usually appears somewhere in the middle of that process, not at the beginning.
Frequently Asked Questions
How to read celtic cross tarot cards if I am a beginner?
Don’t try to memorize all ten positions immediately. Start by reading the cross (Cards 1-6) to understand the situation, then read the staff (Cards 7-10) to understand the internal and external influences. Use a reference sheet for your first few readings until the layout feels natural.
Can I use the celtic cross for love and relationships?
Absolutely. A love celtic cross tarot reading offers incredible depth for tangled relationship questions. It helps uncover root causes (Card 3), underlying fears (Card 9), and where the connection is genuinely heading (Card 10), rather than just giving a simple yes or no.
Is there an online celtic cross tarot reading tool I can use?
While doing a physical reading builds a stronger intuitive connection, you can practice interpreting the 10 positions using a free tarot reading celtic cross tool online. However, journaling your own physical pulls will always provide the most profound insights.
What if some cards in the celtic cross seem to contradict each other?
They usually do, and that’s the point. Contradictions in a reading are almost always where the real information lives. The gap between Card 5 (possible outcome) and Card 10 (likely outcome) shows you what needs to change. Contradictions aren’t errors — they’re the reading doing its job.
New to tarot spreads? Start with the 3-Card Tarot Spread — it’s the fastest way to get comfortable reading cards in relationship to each other before you tackle the Celtic Cross.